Intro
This blog post will be a step-by-step tutorial for inserting the x64 and x86 Assembly Language code into a Visual Studio C++ project. For the purpose of this example I will be using Visual Studio 2019, community edition.
For brevity I will assume that the reader is familiar with both x64 and x86 Assembly language instructions and with the Windows calling conventions.
And, if you don't like reading blog posts, make sure to check my video recap at the end.
Tutorial
Before we can begin adding some Assembly language code into our Visual Studio C++ project, I need to point out, that since introduction of the x64 CPUs,
Microsoft compiler no longer allows inline inclusion of the Assembly code with the __asm keyword.
Thus, the only means of adding our Assembly language code is to include it in its own separate file(s). Each file also has to be included in the correct build configuration to ensure that it adheres to the correct syntax, depending on the selected CPU bitness of the C++ project.
Let's review the process step-by-step:
- Create a C++ project using Visual Studio.
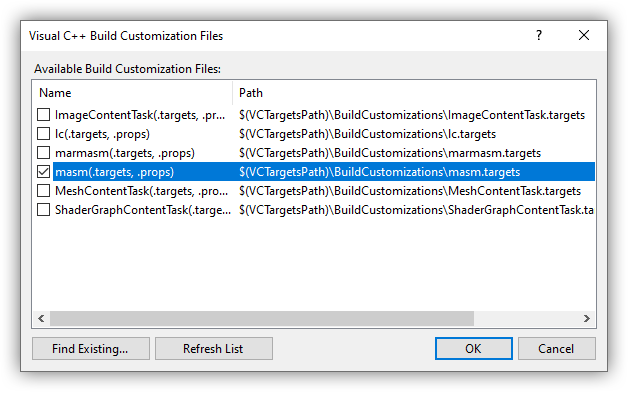
- Let's start from adding the Microsoft Macro Assembler into the build. Right-click on the project name in the Solution Explorer,
then go to
Build Dependencies->Build Customizationsand make sure to checkmasm(.targets, .props)in the list and clickOK: - Change build configuration to
Release,x64: - Then let's add a new
.asmfile to the C++ project that will contain 64-bit Assembly instructions.Right-click on the project name in the Solution Explorer, select
Add->New Item, then selectHeader File (.h)from the list, and give it a name. Make sure to provide the.asmextension. For better readability, let's name this fileasm64.asm: - When the new
asm64.asmfile opens up, delete everything from it and type up the x64 Assembly language instructions into it.Just as a test, I will add the
asm_funcfunction that will call aMessageBoxAPI, but before that, it will call our C++ functionGetMsgBoxType. So let's code it all:x86-64[Copy].data msgCaption db "Message box text",0 .code ALIGN 16 EXTERN GetMsgBoxType : PROC ; EXTERN MessageBoxA : PROC EXTERN __imp_MessageBoxA : QWORD asm_func PROC ; RCX = address for the string for the message box sub rsp, 28h ; shadow stack mov [rsp], rcx call GetMsgBoxType mov r9, rax mov r8, [rsp] lea rdx, [msgCaption] xor ecx, ecx call [__imp_MessageBoxA] add rsp, 28h ; restoring shadow stack ret asm_func ENDP ENDNote that I'm using the
__imp_prefix when calling theMessageBoxAAPI. Check this blog post to understand the significance of that prefix. - Then add another
.asmfile that will contain 32-bit Assembly instructions.Right-click on the project name in the Solution Explorer, select
Add->New Item, then selectHeader File (.h)from the list, and give it a name. Make sure to provide the.asmextension. For better readability, let's name this fileasm32.asm: - In the new
asm32.asmfile remove its default contents and fill it in with thex86Assembly language instructions. I will duplicate the functionality of thex64code:x86[Copy].686p .model flat, C .data msgCaption db "Message box text",0 .code ALIGN 8 EXTERN _imp__MessageBoxA@16 : DWORD EXTERN GetMsgBoxType : PROC OPTION LANGUAGE: SYSCALL @asm_func@4 PROC ; ECX = address for the string for the message box push ecx call GetMsgBoxType pop ecx pop edx ; return address push eax ; uType lea eax, [msgCaption] push eax ; lpCaption push ecx ; lpText push 0 ; hWnd push edx ; return address jmp [_imp__MessageBoxA@16] @asm_func@4 ENDP OPTION LANGUAGE: C ENDNote that because of the
__fastcallcalling convention I have to decorate theasm_funcfunction name with the@prefix and suffix, and also end it with the number of bytes that are passed into that function.Similar technique is applied to the
MessageBoxAcall, that is using the__stdcallcalling convention. In that case though, it is prepended with the_and suffixed with the@, and followed up with the number of bytes that are passed into that API as parameters.Additionally, please note that I also used the
__imp_prefix on that API call to avoid invocation of the unnecessary JMP call. I also had to remove the leading underscore from it to account for the.model Cdeclaration that will instruct the MASM compiler to add_to function names by default. This is a rudiment of the legacy x86 MASM compiler.Invoking the
OPTION LANGUAGE: SYSCALLdirective before declaring theasm_funcfunction avoids automatic prefixing of function names with underscores. - The 32-bit Assembly file may require an additional step to enable
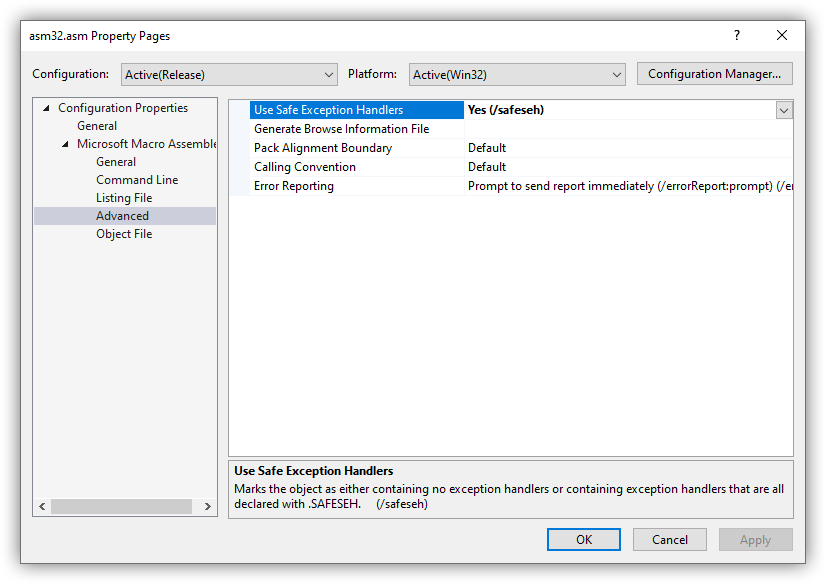
.SAFESEH. For that, right-click theasm32.asmfile in the Solution Explorer, selectProperties. Then go toConfiguration Properties->Microsoft Macro Assember->Advancedand selectYes (/safeseh)for theUse Safe Exception Handlersoption and clickOK: - Next we need to exclude appropriate
.asmfiles from specific bitnesses of the build. Whilex64build is selected, right-click on theasm32.asmfile in the Solution Explorer, selectProperties. Then go toConfiguration Properties->Generaland selectYesfor theExcluded From Buildsetting. ClickOK:This will exclude the 32-bit Assembly language file from the 64-bit configuration build.
- Then switch build configuration to
x86: - Right-click on the
asm64.asmfile in the Solution Explorer, and selectProperties. Then go toConfiguration Properties->Generaland selectYesfor theExcluded From Buildsetting. ClickOK.This will exclude the 64-bit Assembly language file from the 32-bit configuration build.
- Lastly, we need to write our C++ code to call our Assembly function. In that case I will use the auto-generated
.cppfile to write the following:C++[Copy]#include <Windows.h> extern "C" void __fastcall asm_func(const char* lpText); int main() { asm_func("Hello world!"); } extern "C" UINT GetMsgBoxType() { return MB_YESNOCANCEL | MB_ICONINFORMATION; }Note that I'm declaring our Assembly language function
asm_funcwith theextern "C"keyword. This will make it adhere to the C-name mangling scheme. Additionally, I also declare our callbackGetMsgBoxTypefunction with the same keyword so that we can refer to it by name from our Assembly code. - Finally, build both 64-bit and 32-bit versions of the project and make sure that they build and run.
Video Overview
And lastly, here's a video recap of what you've just read above with some additional details:
Conclusion
This was a quick overview of how you can add some Assembly language code into your C++ projects compiled with the Microsoft Visual Studio. Note that to make this blog post short I did not delve into specifics of writing the Assembly code itself. For that please refer to different tutorials.


