
Intro
If you have ever tried to write a kernel driver for any modern version of Windows you probably witnessed a hurdle in trying to run it. Your driver wouldn't load, unless it is properly signed by Microsoft. But how do you do that, since you obviously don't have access to their code-signing certificate?
This blog post will guide you through the steps needed to achieve code-signing of your driver so that it can run on a modern version of Windows.
Table of Contents
This post turned out to be longer and more thorough than I anticipated, thus I feel like it needs its own table of contents:
- Driver Signing Restrictions
- A Debugging Workaround
- Steps For Code-Signing Kernel Drivers
- Requirements & Restrictions
- Preparing to Get an EV Code-Signing Certificate
- How To Pick a Certificate Authority
- Upselling
- Cost of a Code-Signing Certificate & How to Pick a CA
- Why an Extended Validation (EV) Code-Signing Certificate?
- Applying for an EV Code-Signing Certificate
- Finalizing Application For an EV Code-Signing Certificate
- Creating an Account at the Microsoft Partner Center
- Building Your Driver & Packaging It Into a .CAB File
- Creating an .INF File
- Combining Your Driver Files
- Creating a .DDF File
- Verifying Files For a .CAB File
- Generating a .CAB File
- Code-Signing Your Packaged .CAB File
- Signing Your .CAB Package at the Microsoft Hardware Portal
- A Gray Zone Workaround
- Conclusion
Driver Signing Restrictions
A few years back Microsoft introduced mandatory code-signing of the kernel drivers for their 64-bit versions of the operating system. At the time 32-bit versions of Windows were not affected. But now, considering the fact that almost all installations of Windows are 64-bit, it has become a must to code-sign your kernel drivers if you want them to be loaded into Windows.
On top of that, the code-signing alone is not enough. To be able to load into Windows, the driver must be signed by Microsoft themselves. This concept is nothing new. It was used by Apple since the get-go for their iOS for any apps distributed through the App Store.
The reasoning behind such restriction is mostly security and stability of the operating system. By requiring a mandatory signature for all drivers without exception the operating system greatly reduces the number of malicious drivers (i.e. rootkits) or poorly written drivers that could seriously compromise Windows. So in a sense, the decision to require such restrictive code-signing for kernel drivers is a good thing for everyone: for consumers, developers and for Microsoft themselves.
My company has recently gone through the process of code-signing our kernel drivers with Microsoft, and thus I want to share the process with you.
A Debugging Workaround
First, let me point out how you can bypass code-signing and test-run your drivers in a development environment. Microsoft obviously anticipated such condition and reserved a special "Test mode" that you can put Windows in to run unsigned drivers. You can put your OS into the test mode following these manual steps, or you can use my Driver Loader/Unloader tool to do it for you.

This mode is obviously out of the scope for this article, as you can't rely on the OS being in a test mode in a production environment. But it is worth mentioning it, since signing your driver every time you build it during a development cycle would be a giant waste of time and resources.
I am sure I don't have to say this, but please do not try to code the installer for your application to enable "test signing mode" programmatically so that you don't have to code-sign your kernel drivers! This is a global setting that will require a reboot, but worse yet, it will not only jeopardize the security of the target operating system, but will also put your installer on the naughty list for the antivirus vendors.
So my sincere advice - don't do it!
Steps For Code-Signing Kernel Drivers
To be able to code-sign your Windows kernel drivers the process is roughly the following.

These steps need to be done once (and need to be repeated after a few years):
- Obtain Extended Validation (EV) code-signing certificate.
- Create an account at the Microsoft Partner Center for the hardware signing.
And these steps have to be repeated for every new build of your driver binaries:
- Build your driver.
- Create a
.cabfile with your driver's executables. - Code-sign the resulting
.cabfile with your own EV code-signing certificate. - Uploaded your signed
.cabfile to the Microsoft Partner Center for the hardware signing. - Wait for the certification process.
- And finally download your driver signed by Microsoft.
The following chapters will expand on each of these steps in more detail. To make it easier to follow, I will be giving an example of signing my own driver for the InjectAll project, described in this blog post.
Requirements & Restrictions

But before you jump into preparation for code-signing your Windows kernel drivers, make sure that you pass the following requirements:
- Only a registered company can purchase an EV code-signing certificate. Sorry to all the individual developers, but
you won't be able to buy (legally) an EV certificate. You can purchase an IV code-signing certificate, but Microsoft will not accept it for kernel driver signing. So don't waste your time and money.
There's one shady workaround in this process. I will show it later, but if I were you, I would try to stay away from using it as you really don't want to jeopardize the signature of your driver.
- Your company will need to have a physical address (where it was registered.) An internet, or virtual company, will not suffice.
- The actual code-signing of your driver will require an internet connection, just in case you are working offline.
- And, the process of code-signing by Microsoft is mostly a manual process, and to the best of my knowledge, cannot be automated, just in case you prefer to use CI/CD platform like CircleCI for your development.
So now, as you are aware of the requirements, let's begin the process itself.
Preparing to Get an EV Code-Signing Certificate

This, and the next step will probably be the most time-consuming. As I noted above, only a publicly registered company can legally obtain an EV code-signing certificate. Make sure that your company has the following:
- Company Registration must be publicly available from the state and city where your company was registered as a legal entity in, or was incorporated. This is specific for each country, but in US, this is a public information that is available from a government listing for each state. It would be great if you could obtain a publicly available URL to such listing.
For US, you will also need to obtain the Employer Identification Number (or EIN) for your company.
- Dun & Bradstreet Listing seems to be used the most for verification. Go to their website and check through the search option if your company is listed with them.
In most cases your company doesn't have to do anything to be listed at D&B. They will find and scrape the info about your company on their own. This is their line of business to sell information about you.
Check that the company name and address are correct. This is all you need to do.
If for some reason your company is not listed with D&B, add it yourself through a request to obtain a D-U-N-S number. Note though that in this case it may take some time for your company to be listed at the public area of the D&B website.
- Google Business Listing can be created for free, but chances are that your business is already on Google. To check, search for your business on Google Maps.
The important thing to note here is that the phone number that is listed for your company with Google Business should be a working phone number that you have access to. That number will be used to validate your business listing. I will describe it later, but basically you will get a phone call where a human being will ask you a few questions to confirm your intentions to purchase an EV code-signing certificate.
In case you have an old phone number listed on Google Maps, or the one that you no longer have access to, make sure to correct it first before applying for the EV code-signing certificate for your company.
Can validation be done via other means, say, via email? Unfortunately the answer seems to be no. Most certificate authority companies, that will be validating your company, seem to require a working phone number that is publicly listed.
If you have given up a landline for your company and do most of your customer relationships online via more modern means, a workaround, for a US company, would be to get a free Google Voice number, or from any other location, you can use a phone line from the OpenPhone service. Just make sure that after you register it, that it is listed in the public Google Business account for your company.
- Your Company Website must provide some publicly available information about its line of business.
- Additional Public Resources with information about your company may include: Open Corporations, White Pages, and others. Search for your company name on Google and get URLs for any publicly available resources that list it.
- Your Company's Physical Address will be required by most certificate authorities to issue a EV code-signing certificate. Don't ask me why. This is most certainly a rudiment from the old days. The certificate authority will not send an agent to verify that the address indeed has your company logo displayed all over it, you just need to provide them with one.
As a possible workaround, if your internet company is registered in US, you can try to get a virtual mailbox from the following companies. Note that this service is not free and requires monthly subscription:
Note that I'm not associated with any of these services, and you will need to check their terms of service before you sign up.
Also note that after you obtain one of the virtual mailbox addresses, you will need to change it with the city and state where you registered your company to update its registration record. This process may take some time and in some states may require a physical trip to the government agency that does the registration.
- Copies of Your Company's Registration in the PDF form will be required by the certificate authority.
Some certificate authorities may require additional documentation. The documents that I showed above were necessary to obtain our particular EV code-signing certificate.
How To Pick a Certificate Authority
There are quite a few certificate authorities (or CAs) these days.

A CA is basically a company that performs verification of an applicant for the issuance of a code-signing certificate. And if the application is approved, a CA also issues a pair of a private and public RSA keys that can be used for code-signing. After that, a CA also maintains a record of an issued code-signing certificate. There are other functions that CAs perform, but they fall outside of the scope of this article.
In most cases, a public RSA key, paired with some record-keeping details about the entity does code-signing, is stored in a small data file, that is called a code-signing certificate. Like the name suggests, such certificate can be shared with anyone who wants to see it, and is primarily used to verify that the signature on the binary file is genuine.
When an RSA private key is included in the code-signing certificate, such certificate can be used to code-sign binary files. Due to this reason, such certificate must be closely guarded by the entity that owns it and should never leave their privately accessed area. If they lose access to certificate with their private key, a thief that stole it will be able to impersonate their signature.
Storage of a Private Key
One important distinction to note is how private and public keys are stored after they are issued by a CA. By definition of the RSA encryption, a private key should be kept in a secret place and should be never revealed by the signer. In contrast, a public key is used to verify the code signature and to identify the signer, and can be revealed publicly.
In case of a IV (Individual Validation) or OV (Organization Validation) code-signing certificates, the private key is issued to the signer in a software form and it becomes their responsibility to keep it in a safe place. (You basically download it from the CA's website and install it on your local computer.) And that is exactly why the IV or OV code-signing certificates quite often get leaked, lost, or stolen by malware, which may allow for a thief to start faking signatures on behalf of the victim organization or an individual developer.
An EV (Extended Validation) code-signing certificate is not supposed to be issued in a software form, and in most cases is issued on a hardware dongle, like a USB device, where your private key never leaves that hardware device. This makes it more difficult to steal, as it adds another level of complexity. But that unfortunately also adds a level of inconvenience for developers that need to use such EV certificate for code-signing. For instance, code-signing from multiple workstations becomes a hassle. Or, automation via a CI/CD platform falls out of the question, as such will require the CI/CD service to have access to your company's physical USB dongle for code-signing.
But, as a pleasant alternative to hardware dongles, I've discovered that some CAs allow to use their online portals to store your private key. This is somewhat of a compromise between a hardware dongle and a software copy of the private key.
Upselling
Additionally, you need to be able to navigate through the thicket of marketing material that most CAs will throw at you on their websites.

Most CAs will offer a wide range of other certificates for sale: anything from HTTPS/TLS, or website certificates, to email and PDF signing, and more. You don't need any of that stuff for code-signing your Windows drivers. And to be honest, most of these services are pure upselling.
Some of my keen readers may pick on the latest trend in the digital certificate industry and say that companies such as Let's Encrypt have shown us that these days there's no need to pay for any digital certificates, and that Let's Encrypt can issue them for free.This will be absolutely true - you don't need to pay for your HTTPS/TLS, or website certificate!
But code-signing certificates are slightly different. What you are paying for is for the CA to validate, or verify that you are who you say you are. And the more verification they have to do (based on the type of the code-signing certificate), the more expensive that service is.
If you ask me, the economics of the Windows kernel driver signing works as follows:
Microsoft don't want any Joe Schmoe to gain access to a code-signing certificate and thus potentially jeopardize their operating system with either malware or bad software. So they needed to find a way to restrict code-signing. One way to do this is by vetting every potential applicant for a code-signing certificate.
Another more stringent restriction is to require certain parts of the operating system, that are more critical, like kernel drivers for instance, to be signed by organizations only. By applying this restriction Microsoft make it more difficult for an average wrong-doer, or even for an organized gang, to obtain access to a code-signing certificate.
Finally, to make their own life easier, Microsoft simply outsource the verification process to some third-party companies, or CAs, that they trust. The list of trusted CAs is quite short. I'll show it next. And thus those "special CAs" are the ones who are doing the verification for Microsoft.
In turn those CAs charge applicants for this premium service. And that is why you have to pay for your code-signing certificate.
Cost of a Code-Signing Certificate & How to Pick a CA

OK, so as you collected all the required documents and set up all the needed services. Now it's time to pick a certificate authority (or CA) to buy your EV code-signing certificate from.
One important thing to note here is that Microsoft lists only some CAs that they will accept EV certificates from. So make sure to follow that list. For now, they list the following CAs:
As time goes by, this blog post may become outdated. So before proceeding with your selection of a CA, make sure to verify that it is still accepted by Microsoft for their kernel driver signing using this page, or by Googling it, if the link is outdated as well!
All of the CA websites that I listed above are incredibly confusing for most people, and are full of fake assurances and marketing scare tactics. What you need to keep in mind is this simple scheme: All you need to get from a CA is a pair of a private and a public RSA keys that you can use for code-signing. You absolutely do not need anything else!
In some cases you may also need help from the CA's tech support to install their certificate. But that is mostly due to the usability of their bad software that should install their certificate on your system. And once that certificate is installed, you can forget about it. You won't need that CA for the duration, or a life-time of the certificate that they issued you.
So having said this, what is the criteria that one needs to use to pick the CA to purchase an EV code-signing certificate from? Well, the answer is simple - price. And that is it!
So let's list all of the prices that CAs charge, as they were at the time of this writing:
| CA (By Name) | Price, USD | |
|---|---|---|
| DigiCert | $699 | For 1 year |
| $1328 | For 2 years | |
| $1992 | For 3 years | |
| Entrust | ? | Annoying website, where they want you to contact sales. Good luck! |
| GlobalSign | $410 | For 1 year |
| $760 | For 2 years | |
| $950 | For 3 years | |
| SSL.com | $349 + $200* | For 1 year |
| $598 + $200* | For 2 years | |
| $747 + $200* | For 3 years |
* - refer to the addendum about my later experience that I had with SSL.COM.
Big warning here: As I learned from dealing with SSL.COM, the price listed at a CA's website most certainly does not include the cost of the USB dongle to store the private key for your EV code-signing certificate. SSL.COM charged me $200 additionally for their YubiKey dongle.
Note that each CA has a lifespan of their code-signing certificate. This means that after it expires you will need to order another code-signing certificate if you want to continue signing your binaries. The application process will be less stringent, but similar. Don't expect an automatic renewal.
Well, having shown my logic, I don't need to tell you which CA I picked. Also, knowing how long it takes to go through their verification process, and that each code-signing certificate needs to build reputation to avoid most false-positives, it will be prudent to purchase the longest certificate available, i.e. a 3-year one in this case.
Why an Extended Validation (EV) Code-Signing Certificate?
Even though an EV code-signing certificate sounds like an obvious upselling from the CAs, needed only for Microsoft to code-sign your Windows kernel drivers, there are still some benefits of having it just for regular code-signing. Let me list some reasons that come to mind:
- Not As Many False-Positives: A false-positive is a false identification of your code-signed binary by anti-virus product (AVP) as malicious. Since you are the one who wrote it, you can tell for sure whether or not it contains any malicious code. And the most annoying thing that any developer can endure is having their product labeled as "malicious" by some junk AVP.
Having your binary code-signed is one way to reduce the number of false-positives. But it is not a panacea.
On top of that, the IV or OV code-signing certificates are not immediately recognized by most AVPs. This means that when you purchase such a code-signing certificate and sign your binaries with it, they will not be immediately recognized. For instance, when you try to download your signed binary from an internet, Microsoft SmartScreen will still be flagging it with "Windows has stopped a potentially dangerous software from running." A message that most software vendors would not want to see about their products.
To make your IV or OV code signing certificate work, it has to "gain reputation". What this means is only someone's guess. This is like asking, why did my YouTube channel suddenly fall out of favor? No one, except some pompous assholes at Google knows. The same is true with the Microsoft SmartScreen.
From my personal experience I can tell you that for the Microsoft SmartScreen to begin recognizing your binaries code-signed with an IV or an OV certificate, you need to let many other people download and run them. Then depending on the number of downloads - my guess is that that number must total in thousands - they will whitelist your code-signing certificate and it won't be showing those ominous warnings anymore. And depending on how popular your software is, this process may take from hours to days to even months.
With the EV code signing certificate, the process is less annoying. Your binaries code-signed with the EV certificate will be recognized by most AVPs. But not by all! This is another upselling point by the CAs, stating an "immediate recognition by the Microsoft SmartScreen." This is not true! Most AVPs will be indeed more likely to whitelist it, but not all.
For instance, when I used our brand-new EV code-signing certificate to sign my first binary, for the lack of a better choice, I used a hello-world stock app compiled by the Visual Studio. A later attempt to download the signed copy of it resulted in Google Chrome blocking it as "potentially malicious". So yeah, there's some reputation process at play there as well. Although it is not as extensive as with the IV or OV certificates.
- Although having to deal with a hardware dongle (of an EV certificate) for code signing can be a pain, it is much more secure than just keeping its private key in your computer. There are countless cases when a code-signing private key was leaked, or stolen, which could result in quite embarrassing situations for the company.
Having your private key stored in a hardware dongle adds quite a substantial protection to the integrity of your private key.
Applying for an EV Code-Signing Certificate
So once you picked the CA that you want to purchase your EV code-signing certificate from, you need to go through the application process on their website. It is somewhat straightforward. You will need to create an account first, preferably using your work email address to avoid any additional questions. After that, they will take your payment and make you fill out their form with the information about your business.
At this stage you will need to pull out all the info that you prepared earlier. If you did your homework well, this stage won't take more than a few minutes.
Most CAs take payments via major credit and debit card brands (Visa or MasterCard), as well as through PayPal.
To make the process less abstract, I will now switch to the CA that I picked personally. Like I showed above, it's not hard to see that SSL.com provides the best bang for your buck. (Or the least best bang for the lesser charge, as we can interpret this to the CA business.)
Please read my later update about the business practices of SSL.COM that I learned after I wrote this blog post.
Before we continue, let me give a couple of reasons why I picked them.
Why SSL.COM?
Just to explain why I chose SSL.COM:
I need to point out that I am in no way associated with SSL.com, nor that they are sponsoring or paying me in any way. I merely picked their EV code-signing certificate, because it was the most economically viable offer.
Please read my later update about the business practices of SSL.COM that I learned after I wrote this blog post.
- The weightiest reason was that SSL.COM charged the least. Like I explained above, the only thing that you need from a CA is for them to issue a pair of the RSA keys for your code-signing certificate. So why pay more for any other stuff?
- SSL.COM also don't force a hardware dongle to store the private key. They offer what they call an eSigner service (read a caveat), that allows you to store your private key in their online portal and access it that way. This greatly simplifies the process of code-signing, meaning that using this service you can code-sign from several development computers, and most importantly, use automated builds with services like CircleCI.
Note that by using the online portal provided by SSL.COM to store our private key, we are technically lowering the "security bar" for the integrity of our private key. In this case, security and convenience go in opposite directions.
There's really nothing else that attracted me to SSL.COM. To show that I am not paid in any way to promote them, let me list some negatives as well:
- The software to install SSL.COM certificate on my development machine was quite bad. It lacked the basic user-friendly UI. Then, when installing the certificate, it required an administrative access (since I pretty much never log in as an administrator.) But then, it installed the certificate into the administrator account, which makes it helluva inconvenient to code-sign from a Visual Studio, that always runs as a standard user in my case. It seems like whoever wrote that software at SSL.COM assumed that everyone logs in to their computers as an admin. Which is not good for a company that sells "security solutions" 😂
- The installation of the certificate itself did not go smoothly and I had to contact the tech support at SSL.COM. The process wasn't the fastest or the smoothest. All their tech support is done via email (or at least it was in my case.) And the first guy that responded to my email wasn't helpful at all. He just repeated what I asked him. So I had to contact them the second time. The second response from SSL.COM clued me in to why their software didn't work and I was able to resolve my issue myself.
- I learned a lot more about SSL.COM's business practices later, which will most certainly not make me pick them!
Big Warning About SSL.COM
I'm writing this as an update to my original blog post of 2 months ago. After I purchased my code-signing certificate from SSL.COM, I was hit with a gotcha that that company had in store for me. After I paid for my certificate their website had a link to a document that showed how to use what they called an eSigner service. (I explained how it works above.) It is basically their way to store your private key on their servers and to let you code-sign without the need of a USB dongle. It sounded like a great idea at first.
So I started using it, only to find out that they charge a hefty monthly fee for that. There was absolutely no warning or even a listing of charges in the document that explained how to use it. And I am yet to find out their price schedule, in despite of my multiple requests.
The best reference to the eSigner service and that SSL.COM charges for it (that I could find) is this link explaining how you can cancel it.
I found out about their charges when I received their email after about a month and a half since I got my code-signing certificate. The email simply stated that I have an outstanding bill to pay. I contacted their support and was told that I owe them $200 for two months of my use of the eSigner service. Obviously it's a subscription service, and thus the charges accrue over time.
I replied right away that I wasn't aware of the charges for that service and that I wish to cancel. Suffice it to say that no one returned my email until about the next month when I got another bill, for another $100. At this stage I'm yet to find a way how to cancel it.
Since I already committed to using SSL.COM I needed a way to be able to code-sign with my EV certificate. To do that though, I needed a way to store its private key, that according to SSL.COM, could be possible if I purchased a YubiKey from them. The additional charge for that was $200.So keep in mind that besides paying their original fee to issue an EV code-signing certificate, you will need to either pay a one-time $200 fee for the USB dongle, or pay $100 per month for their eSigner online service, which may be a good deal for a large organization.
At this stage, I have the YubiKey with my private key on it in my physical possession. So I can code-sign my binaries. The thing to note though is that you will need to add at least $200 to the amount you pay originally to receive your code signing certificate.
SSL.COM Not a Root CA Prior to Windows 8
Additional blow to SSL.COM, which is obviously not mentioned on their website, is that they are not in the Windows root CA store prior to Windows 8. In other words, if you plan to code-sign your binaries to run on older versions of the operating system, like Windows 7, your signature will not be recognized as SSL.COM is not in the root CA store there.
So what you get is this error:
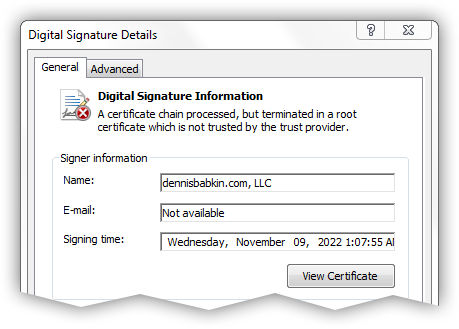
It is needless to say that you don't want to see this message on your code-signed file.
Finalizing Application For an EV Code-Signing Certificate
After I submitted all required documents at the SSL.COM website, they contacted me the next day to my provided email address with clarification of our order and with the request for some additional details.
After I complied with the CA's requests, they got back to me with a link to set up a business verification call. I replied with the time that was convenient for me and around that time someone called the phone line with a few questions about our company.
The person asked the following simple questions:
- Whether or not I requested an EV code signing certificate.
- He asked me to repeat the name and the address of the company.
- He then confirmed the duration of the certificate.
- And finally asked me if the phone number that he called was the phone number that the company conducts business with.
And that was pretty much it. The phone call itself was very simple.
After that, a few hours later, I received an email with the confirmation that the EV code-signing certificate had been issued and that I can collect it using provided link.
To collect the certificate, I had to log back in to the SSL.COM website and do three things:
- Enable their eSigning for my certificate. (This is the feature that stores the private key for my certificate on their servers and lets me access it for signing using their provided software.)
Please read my later update about the business practices of SSL.COM that I learned after I wrote this blog post.
- Enable two-factor-authentication for the eSigning software.
- Download their eSigning software.
Then after I installed the SSL.COM's eSigning software on my local machine and configured it, I was able to use Microsoft's signtool to code-sign my binaries like I would in any other case.
Creating an Account at the Microsoft Partner Center
Once you have your EV code-signing certificate, you need to create an account at the Microsoft Partner Center portal. This is the webservice that will allow you to submit your signed kernel driver for signing by Microsoft.
But what seemed like a simple process - to create an account at that portal - turned into a multi-day headache. Let me explain.
For some unknown to me reason, Microsoft can't make it simple and have you log in using just one account. To sign your kernel drivers it looked like you needed to have two accounts: I first created an account for their Partner Center portal, and then needed another account for the Azure AD. And this is where the problems began.
It is important to sign in to the Microsoft Partner Center using your Azure AD account. If you don't have one, you can create it first. It is free.
When I signed in to the Microsoft Partner Center, it showed this page. Note that the UI will likely change by the time you read this blog post:

I then had to click the big plus button, that was labeled "My access" in the screenshot above.
After that I had to click "Enroll in programs":

And specify "Hardware":
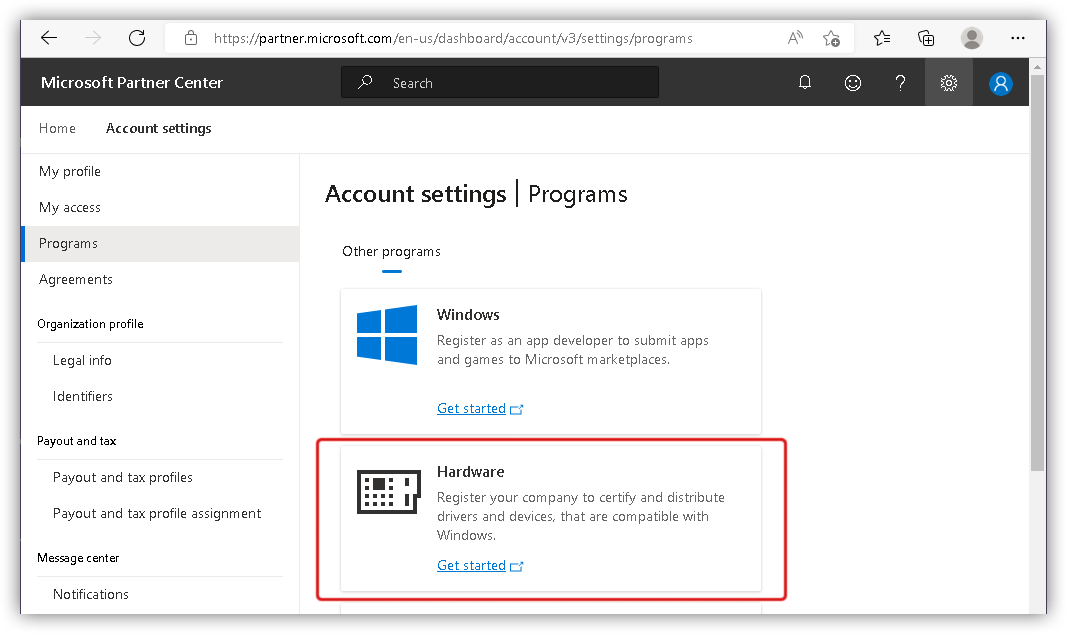
After that the portal will display some basic information about the requirement for the EV code-signing certificate. Click "Next" to proceed.
At this stage, if you did not sign in with your Azure ID account, the page will display this:

My initial mistake was to create a Microsoft Partner Center account and log in with it. Unfortunately due to some bug in the portal's login logic, if you see the page above it will put you into an infinite login loop.If you click the link to "Create new Azure directory", and go through the process of creating an Azure ID account, the sequence will finally bring you to the page that I showed above. In that case, if you click to "Sign in to Azure ID", the page that was shown before will load instead, and if you click "Next" there, it will bring you back to the same login screen.
The only way to escape that login loop was to clear the cookies in the web browser and to log in to the Microsoft Partner Center using my Azure ID account.
I later Googled this problem and found out that it's been like this for over a year (to the date of this writing.) So something tells me that Microsoft aren't really in a hurry to fix this issue.
But if you don't see the screen above, it means that you avoided the dreaded login loop.
At this stage the portal will ask you to specify the country your company is based in, and to provide some information about it.
Make sure to specify your company name exactly as it appears in your EV code-signing certificate.

Then the portal stressed again the need for the EV code-signing certificate (as if we haven't learned that already):

The interesting detail is that the list of available CAs included now-defunct-as-a-CA Symantec on top (with a broken link), and Entrust with the link pointing to some garbage root certificate.
The next page is where the portal verifies that you have access to an EV code-signing certificate:

The portal requests you to download some random binary file and then code-sign it with your EV certificate, and upload it back. Thus, at this point, you won't be able to proceed without an EV certificate issued to the company that you are registering with the portal.
You can sign the random binary file needed for verification using Microsoft'ssigntool. Here's an example of a command line for signing:Command Line[Copy]"path-to\signtool.exe" sign /fd sha256 /tr http://ts.ssl.com /td sha256 /sha1 <thumbprint> "path-to\file-to-sign.exe"Where
<thumbprint>is the thumbprint hash for your code-signing certificate. You can get it from the "Details" window for your code-signing certificate. It is expressed as a long hexadecimal number. Ex:6c531a969d84215a834a396a130d555743266aa3
Finally, if the automatic verification of your EV code-signing certificate goes through, you will be able to access the hardware signing portal. You can tell that by the presence of the "Hardware" button on the home page of the Microsoft Partner Center:
At this stage the hard part is over. Now you are ready to sign your Windows kernel drivers!
Building Your Driver & Packaging It Into a .CAB File
Actual coding of a kernel driver is outside of the scope of this blog post. (For that you can check my other articles, like this one, for instance.) In this post, we will focus on preparing your binary driver file for signing.
After you build your driver, I'm assuming in Visual Studio, you should get two (or more) sets of binary files. I usually build a 64-bit and a 32-bit version. You may also build a set of ARM builds of your driver, depending on the type of hardware it will run on.
I know that 32-bit version of the driver binary file does not need to be signed. So you may opt out from including that configuration for signing. I do it mostly for completeness.
The next step is to package your resulting driver binary files into a .CAB package. Microsoft documents the process quite well, so I won't dwell on it too much. I'll give a short example with my InjectAll driver binaries.
After you build the InjectAll solution in a release configuration for x64 and x86 CPUs, you will need the following files:
Drv32.sys- 32-bit kernel driver binary file.Drv32.pdb- debugging symbols for the Drv32.sys file.Drv64.sys- 64-bit kernel driver binary file.Drv64.pdb- debugging symbols for the Drv64.sys file.
The files above will be needed for submission to the Microsoft portal to sign the driver binaries (or .sys files.)
You may ask, why do we need the symbols (or.pdb) files for signature?I couldn't find the actual reason on the Microsoft's website, except that if you don't include symbols, during submission the portal will issue the following warning:
Warning
This submission does not include symbols. It is recommended to upload symbols within each driver folder. For more information click here.My guess is that once your driver is uploaded, Microsoft will keep track of any incoming crash dumps with reports of BSODs linked to your driver. Those could be forwarded to the driver's developer, or be available at the Microsoft Partner Center portal as bug reports. In either case, having a symbol file can allow Microsoft to show more details on where in your driver the crash took place.
Or, Microsoft can use your symbol files to reverse engineer your driver, if need arises. 😁

Finally, I would strongly recommend to sign your binary files with your code-signing certificate. When Microsoft signs your files as well, it will keep your existing signature on them. Otherwise, make sure to remove all self-signed signatures from your binary driver files that the Visual Studio may have added for you. You can use my SigRemover tool for that.
Creating an .INF File
Additionally, you will need so-called .inf file for your driver. This is what you would normally use for a hardware driver, but it is also needed to sign a software-only device driver.
The format of the .inf file for the Windows hardware driver is described here. But in most part it does not apply to a driver that doesn't deal with hardware, like my InjectAll example. So what do you put into an .inf file in that case?
Microsoft calls these "primitive drivers" and has some information on what to put into an .inf file for them.
Having consulted with Rbmm, I came up with the following .inf file for my InjectAll driver:
[Version]
Signature="$WINDOWS NT$"
Class=System
ClassGuid={4D36E97D-E325-11CE-BFC1-08002BE10318}
Provider=%ProviderString%
PnpLockDown=1
DriverVer=09/14/2022,1.0.0.1
CatalogFile=InjectAll.cat

[DestinationDirs]
DefaultDestDir = 12

[SourceDisksNames]
1 = %DiskId1%,,,""

[SourceDisksFiles.x86]
Drv32.sys = 1,x86

[SourceDisksFiles.amd64]
Drv64.sys = 1,x64

[DefaultInstall.NTamd64]
CopyFiles=@Drv64.sys

[DefaultInstall.NTamd64.Services]
AddService = %ServiceName%, 2, Service_Install_64

[DefaultInstall.NTx86]
CopyFiles=@Drv32.sys

[DefaultInstall.NTx86.Services]
AddService = %ServiceName%, 2, Service_Install_32

[Service_Install_32]
DisplayName    = "Test Driver That Demonstrates Process Injection Technique (32-bit version)"
ServiceType    = 1               ; SERVICE_KERNEL_DRIVER
StartType      = 3               ; SERVICE_DEMAND_START
ErrorControl   = 1               ; SERVICE_ERROR_NORMAL
ServiceBinary  = %12%\Drv32.sys

[Service_Install_64]
DisplayName    = "Test Driver That Demonstrates Process Injection Technique (64-bit version)"
ServiceType    = 1               ; SERVICE_KERNEL_DRIVER
StartType      = 3               ; SERVICE_DEMAND_START
ErrorControl   = 1               ; SERVICE_ERROR_NORMAL
ServiceBinary  = %12%\Drv64.sys

[Strings]
DiskId1 = "InjectAll Driver"
ServiceName = "InjectAll"
ProviderString = "dennisbabkin.com, LLC"
I need to explain a few things, don't I:
- Class - hardware classification of the driver. Since ours is just a software driver, I used a more generic
Systemclass. - ClassGuid - is a GUID for the driver class. I used
{4D36E97D-E325-11CE-BFC1-08002BE10318}which stands forGUID_DEVCLASS_SYSTEM. - DriverVer - I put the date when I was signing the driver, and the version of the driver. It is not really used for anything in this case, as we're not installing our driver using this
.inffile. - CatalogFile - technically this should be a catalog file for the driver, but in my case it's just a place-holder. I don't use catalogs for my driver.
- DefaultDestDir - an old-school way of defining where to place this driver.
12=%SystemRoot%\system32\drivers - Drv32.sys - is a 32-bit build of my driver's binary.
- Drv64.sys - is a 64-bit build of my driver's binary.
- Service_Install_32 - are instructions on how to install a 32-bit version of the driver. It is not really used in my case, as I'm not using the
.inffile to install my driver. - Service_Install_64 - are instructions on how to install a 64-bit version of the driver. It is not used either. See above.
- DisplayName - Concise description of what the driver does.
- ServiceName - Short driver name
- DiskId1 - Arbitrary name for the driver
- ProviderString - Company name that created the driver.
Other fields don't really matter much for a software driver, so you can just copy them as-is.
You can create your .inf file using a Notepad. Just make sure to save it as a plain text file with, you guessed it, an .inf extension. You can save it with the ASCII, or UTF-8 encoding.
Combining Your Driver Files
Now that we have all the needed files for our driver signing, let's combine them all into one directory on your local disk so that we could later create a .CAB package out of them.
The structure of files and directories needed for signing is as follows:
- The root of the
.CABpackage must contain only directories for the driver(s) that you are signing. In our case it will be only one directory as we are signing just one driver. For the lack of a better name, I'll call itInjectAll. - Each directory for the driver that is being signed must have an
.inffile describing the driver. We created such file already, and named itInjectAll.inf. I will place it inside myInjectAlldirectory. - Then goes my own driver structure. Since I am signing a 32-bit and a 64-bit builds of my driver, I placed each one of them into their own directory:
x86andx64, accordingly. - Lastly, each of the
x86andx64directories has its own copy of the driver binary for that bitness:Drv32.sysandDrv64.sys, as well as their corresponding symbol files:Drv32.pdbandDrv64.pdb, accordingly.
To better visualize the file structure that I described above, take a look at this diagram:
- InjectAll
   - InjectAll.inf
   - x64
      - Drv64.sys
	  - Drv64.pdb
   - x86
      - Drv32.sys
	  - Drv32.pdb
You can download this structure in a ZIP file here. (I ZIP'ed it only for you to be able to download it.)
Creating a .DDF File
Besides the .inf file, you need to create a .ddf file. That file will be used to make a .CAB package. It's pretty easy to do. Open the Notepad and place instructions for what to include in your .CAB package.
Again, for my InjectAll driver, I will use the following contents for the .ddf file, that match the structure of files that we laid out above:
.OPTION EXPLICIT     ; Generate errors
.Set CabinetFileCountThreshold=0
.Set FolderFileCountThreshold=0
.Set FolderSizeThreshold=0
.Set MaxCabinetSize=0
.Set MaxDiskFileCount=0
.Set MaxDiskSize=0
.Set CompressionType=MSZIP
.Set Cabinet=on
.Set Compress=on

.Set DestinationDir=InjectAll

InjectAll\InjectAll.inf

.Set DestinationDir=InjectAll\x64

InjectAll\x64\Drv64.sys
InjectAll\x64\Drv64.pdb

.Set DestinationDir=InjectAll\x86

InjectAll\x86\Drv32.sys
InjectAll\x86\Drv32.pdb
You don't really need to change the top part of the file. What matters is the directory and file structure for our .CAB file. I think it's pretty self-explanatory and doesn't need any further explanations.
Make sure to save this file with the .ddf extension in a plain text format.
Verifying Files For a .CAB File
Before we can generate a .CAB file (mostly to save us time during further Microsoft verification) let's verify our .inf file for correctness. For that we will use two automated techniques:
- InfVerif tool is a part of the Windows Driver Kit. Once installed, you can find it in
C:\Program Files (x86)\Windows Kits\10\Tools\x64for the 64-bit version of the OS.This tool can be used to test the
.inffile. Run it as such:Which in case of my InjectAll package translated to this verification:
Command Line[Copy]C:\Windows\system32>cd "path-to\InjectAll" path-to\InjectAll>"C:\Program Files (x86)\Windows Kits\10\Tools\x64\InfVerif.exe" /v "path-to\InjectAll\InjectAll.inf" Running in Verbose Validating InjectAll.inf INF is VALID Checked 1 INF(s) in 0 m 0 s 2 msAs you can see I got a message that my
InjectAll.infis valid. This is what I wanted to see. - Inf2Cat tool can be used to do more thorough check of an
.inffile for signing, as well as to generate a catalog file for it. This tool is located inC:\Program Files (x86)\Windows Kits\10\bin\x86and comes with Windows SDK.I ran the
Inf2Cattool on my InjectAll package as such:Command Line[Copy]C:\Windows\system32>cd "path-to\InjectAll" path-to\InjectAll>"C:\Program Files (x86)\Windows Kits\10\bin\x86\Inf2Cat.exe" /driver:"path-to\InjectAll\InjectAll" /os:10_X86,10_X64 /verbose Processing directory (path-to\InjectAll\InjectAll\) file (injectall.inf) Processing directory (path-to\InjectAll\InjectAll\x64) file (drv64.pdb) Processing directory (path-to\InjectAll\InjectAll\x64) file (drv64.sys) Processing directory (path-to\InjectAll\InjectAll\x86) file (drv32.pdb) Processing directory (path-to\InjectAll\InjectAll\x86) file (drv32.sys) Parsing INF: path-to\InjectAll\InjectAll\injectall.inf Finished parsing INFs Processing INF: path-to\InjectAll\InjectAll\injectall.inf Finished processing INFs Testing driver package... Testing driver package... Testing driver package... Testing driver package... Testing driver package... Testing driver package... Testing driver package... Testing driver package... Testing driver package... Testing driver package... Testing driver package... Testing driver package... Testing driver package... Testing driver package... Testing driver package... Testing driver package... Testing driver package... Testing driver package... Signability test complete. Errors: None Warnings: None Catalog generation complete. path-to\InjectAll\InjectAll\injectall.catAs you can see it passed all the tests, which is what I needed to check.
One thing I need to clarify, is the command line for the
Inf2Catcall:/driver:- specifies the driver package directory that we combined earlier./os:- specifies the list of operating systems the driver was designed to run on. In this case I chose a very simple list:10_X86,10_X64. For a complete list of specifiers for this parameter check here.
Generating a .CAB File
The final stage of this process is to generate a .CAB file. The process is very simple, once we have all the preparatory work done (that I described above.)
To generate a .CAB file we can use Microsoft's MakeCab tool, that is shipped with every version of Windows.
I ran the following command on the .ddf file that I created earlier:
C:\Windows\system32>cd "path-to\InjectAll"

makecab /d CabinetName1=InjectAll.cab /D DiskDirectoryTemplate=. /f InjectAll.ddf
The important thing to note here is that I had to change the current directory (with thecdcommand) to where myInjectAll.ddffile was located, that happened to be in the same directory as my driver files that I prepared for the.CABpackage earlier.
In the command line above, I used the following parameters:
CabinetName1- name of the.CABfile to create.DiskDirectoryTemplate- directory where to place the resulting.CABfile.
Once I ran that command, I got my InjectAll.cab file in the same directory where I had my InjectAll.ddf file.
In case you want to check how the final InjectAll.cab file should look like, you can download it here. (That file is also code-signed with our EV certificate, as I describe next.)
Code-Signing Your Packaged .CAB File
Before you can upload your .CAB package to the Microsoft portal for signing, you need to sign it with your own EV code-signing certificate first. This step is very easy to miss, but if you do, your .CAB file will be rejected.
Use Microsoft's signtool to sign your .CAB file. I used the following command line:
"path-to\signtool.exe" sign /fd sha256 /tr http://ts.ssl.com /td sha256 /sha1 <thumbprint> "path-to\InjectAll.cab"Where <thumbprint> is the thumbprint hash for your code-signing certificate. You can get it from the "Details" window for your code-signing certificate. It is expressed as a long hexadecimal number. Ex: 6c531a969d84215a834a396a130d555743266aa3
Make sure that after running the signtool your .CAB file is now signed by checking its Properties -> Digital Signatures. The tab must contain a digital signature from your company.
Signing Your .CAB Package at the Microsoft Hardware Portal
Now that your .CAB file is code-signed with your EV certificate, you may proceed with uploading it to the Microsoft Partner Center portal for signing by Microsoft.
By now you must have created an account, and after you sign in, click on the "Hardware" button to begin driver submission:
Click on the "Submit new hardware" link:

At this stage you will be asked to provide the "Product name" for your driver and upload your code-signed .CAB package.
Note that Microsoft will bundle all your signed drivers in one list on the front page of the hardware portal, so I would strongly advise you to include either a version number, or a date of signing in the "Product name" field, as in: InjectAll - v.1.0.0.1. This way it will be easier for you to locate this specific driver afterwards.
After you upload your signed .CAB package, you will need to check SKUs of the operating systems that your driver will run on. In case of my InjectAll driver, I knew that it will run on any OS that came with an Intel-based CPU (which excluded the ARM architecture):

Then you can begin submission process, which can take from a few minutes to hours. During this process you will see an interactive progress bar:
Note that in case your submission results in an error, the portal will display it for you and the process will be aborted:In most cases it will provide a link where you can download a
UniversalLog.txtfile with details about an error. Here's an example:Cab Signature validation failed with error: 0x800B0100In this case you can use my WinAPI Search utility to look up what that error code means (by going to Tools -> Error Code Search):
0x800B0100 = No signature was present in the subject.

Finally, when your driver signing is complete, you will see the result in the portal window:

Now you can click "Download signed files" to download your signed driver to your computer. It will be ZIP'ed in a single file for you, with the driver files signed by Microsoft:
Drv64.sys driver code-signed by Microsoft.
At this point, your driver will be ready to be loaded into supported operating system(s).
Note that Microsoft will keep the original signature(s) on your binary files after they add theirs.
A Gray Zone Workaround

Having shown the legitimate process of code-signing your kernel drivers, while researching the subject I came across one method of bypassing this process that some "enterprising" companies have come up with.
I am not going to give any names, but some company (or maybe several companies) have come up with a scheme where they can let you code-sign your kernel driver using their own EV code-signing certificate. Obviously by charging you a fee for that service.
I am sure such actions are going against the code-signing agreement that such company has signed with Microsoft, which means that their account could be suspended at any moment (if Microsoft catches a wind of what they are doing.) On your side though, by using the services of such company you are risking to have your code-signed driver's signature invalidated by Microsoft if they learn about this loophole.
So my advice - do not use it! It is not worth the risk of antagonizing Microsoft against you and your software.
Conclusion
As you can see, the process of code-signing your Windows kernel drivers is quite complex and requires many steps. At first I was annoyed by how many hoops Microsoft wanted us (developers) to jump through to code-sign our drivers, but later I started to appreciate it. By making the process as it is now (albeit not entirely flawless) they made the latest versions of the operating system much more robust and secure against the rootkit attacks. For which I want to thank them!
Lastly, having written this long blog post, I want to say that I am in no way associated with Microsoft, or with any certificate authority vendors. All words expressed here are my own, and were not endorsed by anyone else.
By sharing this, I hope it helped you navigate the weeds of the kernel driver signing in Windows.